Wednesday, December 8, 2010

Wish You Were Here?

Blessings and Benedictions

Due to the fact that I live in one time zone and work in another, and live 45 minutes from work, I get to spend a lot of time on the road. When my kids were younger I convinced myself that this wasn't a bad thing, as it provided me with some treasured alone time. Back in the day I didn't even have cell service for 30 of those minutes.


Now, all these years later I am still commuting to work, but I have more alone time than I need. I have had to look for another silver lining to those early mornings driving into the sunrise and late afternoons driving off into the sunset. I thought I would share with you some of the scenes God provides me with. I have a front row seat for the show. When those first rays of sun hit the windshield in the morning I can't help but feel God is sending a gift to compensate for the odd hours I keep... 


may the Lord bless you and keep you;


may He make His face to shine unto you and be gracious unto you;


may He make His face to shine on you and be gracious to you;


may He lift His countenance on you and give you peace..  Numbers 6:22-27 (NIV)

See the things you might miss....... Beauty and blessings are everywhere, you just need to remember to look.

Tuesday, December 7, 2010

Peppermint Meringues with Chocolate Filling

This is a recipe from Martha Stewart

Peppermint Meringues with Chocolate Filling


To create the meringues, use a new small paintbrush to brush two or three evenly spaced stripes of gel-paste food coloring onto the length of the inside of a pastry bag fitted with an open-star tip. Fill the bag with meringue, and pipe star shapes onto your parchment-lined baking sheet. Each time you refill the bag with meringue, paint new stripes inside.


Ingredients:


Makes about 5 dozen


3 large egg whites
3/4 cup sugar


1/2 teaspoon pure peppermint extract
Red gel paste food coloring
1 cup heavy cream
6 ounces good-quality semi-sweet chocolate, finely chopped


1. Preheat oven to 175 degrees. Line 2 baking sheets with parchment paper; secure corners with a dab of meringue underneath. Fit pastry bag with a small open-star tip. Set aside. 


2. Make meringues; Put egg whites and sugar in the heatproof bowl of an electric mixer. Set bowl over a pan of simmering water, and stir gently until the sugar has disolved and mixture is warm to the touch, 2-3 minutes.


3. Transfer bowl to an electric mixer fitted with the whisk attachment. mix on medium-high speed until stiff peaks form. Mix in peppermint extract. (Don't forget this ingredient, ask me how I know.)


4. Using a new small paintbrush, paint 2 or 3 stripes of red food coloring inside the pastry bag. Fill bag with 1-2 cups of meringue. Pipe small (3/4 inch high) star shapes onto prepared baking sheets. Refill bag as necessary, adding food coloring each time (not as easy as they make it sound.)


5. Bake cookies until crisp, but not brown, about 1 hour 40 minutes. Let cool completely on sheets on wire racks. (Try not to eat them all.)

6. Meanwhile, make ganache: Heat cream in a small saucepan over medium-low heat until just simmering. Pour over chocolate in a small bowl. Let stand 5 minutes. Let ganache cool at room temperature, stirring every 5-10 minutes until thick enough to hold it's shape, about 45 minutes. (If ganache sets before using, reheat in a heatproof bowl set over a pan of simmering water; repeat cooling process.) (My ganache never did thicken at room temperature, I had to stick it in the fridge for several hours.)


7. Fill a pastry bag fitted with a small plain round tip with ganache. Pipe a small amount onto the bottom of 1 meringue. Sandwich with another. Repeat with remaining ganache and meringues. transfer to wire racks; let set 30 minutes. Cookies can be stored in air-tight containers at room temperature for up to 2 days. 


One more thing, when I went to pipe the ganache onto the meringue, it was still fairly thin and the cookies slid around a bit, make sure you dry them upside down on your wire rack so they balance as they set. I was pleasantly surprised that the ganache solidified quite nicely. Oh, yeah, and just one more thing.... I wound up making a triple batch of these for my cookie exchange and tripled the ganache as well...... I have waaaaaay too much ganache now. One batch of ganache would probably have been enough. Anyone have any suggestions what to do with all this leftover chocolate????

Cookie Exchange

I thought it might be fun this year to have a cookie exchange at work. Several of the girls I work with bring Christmas goodies to share every year anyway, and I thought an official event might get the rest of us slackers in gear. Besides, several of us had been trying to get a bit more adventurous in the kitchen, so this would provide the perfect excuse for some sugar excess....

The first cookie exchange I ever took part in 16 years ago consisted of about 7 ladies. Now for any of you who aren't familiar with how a cookie exchange works, the idea is that you bring a dozen of one type of cookie for each participant, as well as a dozen to eat there. This meant I needed to bring 8 dozen cookies. Now, I used to love to bake sugar cookies, (please note the use of past tense.) I have an impressive collection of cookie cutters, and one of the best sugar cookie recipes around, plus 3 kids old enough to help decorate, but also a baby, which was a point in the "this is crazy" column.

Now I have always felt that part of the key to a yummy sugar cookie, is not rolling your dough too thin, therefore preventing that over-cooked, hard as a rock, this is only a vehicle for frosting, kind of sugar cookie. So I dutifully started making dough. Did I mention my cookie cutters are also those cute chubby, 3-4 inch variety? Can you see where this is leading? One batch of dough, rolled not-to-thick, and cut with those ever so cute chubby cookie cutters, wasn't even making a dozen cookies. Of course my happy little "helpers" promptly lost interest after the first batch of dough. Baby Bear was starting to get fussy, he has always loved his Mommy best and didn't want to play with the Big Kids. By the second batch of dough I am balancing this 35 lb 1 year old on one hip. Thus continued one of the longest cookie baking fiascoes ever. Finally the dozens of cookies were baked, finally the Baby Bear went to sleep, but then I was faced with the monumental task of decorating all those cookies. Eventually I did, I have to say, in the end, I didn't really feel like all that trouble was worth it.

Which brings us back to 16 years later and I am instigating a cookie exchange again. The first one I have participated in since the last all-nighter. This time I am older and wiser though. I am going to be smart enough not to pick such a labor intensive cookie...... Hmmmmm, let me just say that it is a good thing that we didn't have to work today due to icy roads, or I might be up all night again. Stay tuned, pictures and recipes of this years fiasco to follow. I'll give you a hint, the first part of the recipe has three ingredients and on the first batch I forgot one of three ingredients....... now where did I leave that Gingko Biloba?

Monday, November 22, 2010

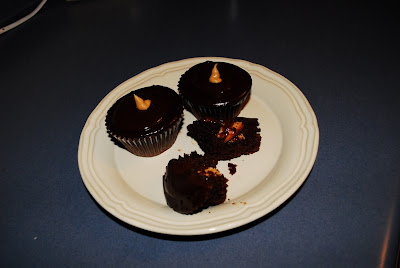
Fresh From The Pink Kitchen: Double Dark Chocolate Cupcakes with Peanut Butter Filling

For November's Sugar High Fridays, the challenge was desserts with a hidden surprise. Here was my contribution:

Double Dark Chocolate Cupcakes with Peanut Butter Filling
  • ACTIVE: 45 MIN
  • TOTAL TIME: 3 HRS
  • SERVINGS: Makes 24 cupcakes
  • MAKE-AHEAD
Ingredients
    1. 3/4 cup plus 2 tablespoons cocoa powder (not Dutch process)
    2. 1/2 cup boiling water
    3. 1 cup buttermilk
    4. 1 3/4 cups all-purpose flour
    5. 1 1/4 teaspoons baking soda
    6. 1/4 teaspoon baking powder
    7. 1/4 teaspoon salt
    8. 1 1/2 sticks plus 3 tablespoons unsalted butter, softened
    9. 1 1/2 cups granulated sugar
    10. 2 large eggs, at room temperature
    11. 1 teaspoon pure vanilla extract
    12. 1 cup creamy peanut butter
    13. 2/3 cup confectioners' sugar
    14. 1 cup heavy cream
    15. 8 ounces semisweet chocolate, chopped
Directions
  1. Preheat the oven to 350° and position 2 racks in the lower and middle third of the oven. Line 24 muffin cups with paper or foil liners. 
  2. Put the cocoa powder in a medium heatproof bowl. Add the boiling water and whisk until a smooth paste forms. Whisk in the buttermilk until combined. In a medium bowl, sift the flour with the baking soda, baking powder and salt. In a large bowl, using an electric mixer, beat 1 1/2 sticks of the butter with the granulated sugar until light and fluffy, about 3 minutes. Beat in the eggs and vanilla, then beat in the dry ingredients in 2 batches, alternating with the cocoa mixture. Carefully spoon the cupcake batter into the lined muffin cups, filling them about two-thirds full. Bake for 20 to 22 minutes, or until the cupcakes are springy. Let the cupcakes cool in the pans for 5 minutes, then transfer them to wire racks to cool completely. 
  3. In a medium bowl, beat the peanut butter with the remaining 3 tablespoons of butter until creamy. Sift the confectioners'' sugar into the bowl and beat until light and fluffy, about 2 minutes. Spoon all but 3 tablespoons of the peanut butter filling into a pastry bag fitted with a 1/4-inch star tip. Holding a cupcake in your hand, plunge the tip into the top of the cake, pushing it about 3/4 inch deep. Gently squeeze the pastry bag to fill the cupcake, withdrawing it slowly as you squeeze; you will feel the cupcake expand slightly as you fill it. Scrape any filling from the top of the cupcake and repeat until all of the cupcakes are filled. 
  4. In a small saucepan, bring the heavy cream to a simmer. Off the heat, add the semisweet chocolate to the cream and let stand for 5 minutes, then whisk the melted chocolate into the cream until smooth. Let the chocolate icing stand until slightly cooled and thickened, about 15 minutes. Dip the tops of the cupcakes into the icing, letting the excess drip back into the pan. Transfer the cupcakes to racks and let stand for 5 minutes. Dip the tops of the cupcakes again and transfer them to racks. Spoon the remaining 3 tablespoons of peanut butter filling into the pastry bag and pipe tiny rosettes on the tops of the cupcakes.

Make Ahead
The cupcakes are best served the same day they are made, but they can be refrigerated overnight in an airtight container.
Notes

Cooking Club Tip: If you don’t have a pastry bag with a fitted tip, you can fill these cupcakes by carving a hole in the center (from the top) with a sharp paring knife. Put the filling in a resealable plastic bag and snip off one of the corners. Pipe the filling directly into the hole.


For the record, I forgot to put the vanilla in the picture...


Mix the cocoa into a paste.

Stir in the buttermilk.


Mix until smooth.


Add the chocolate to the butter and sugar mixture.

The finished product.


Sunday, November 21, 2010

Fresh From The Pink Kitchen: Pumpkin Sweet Rolls

These came from the Gooseberry Patch Homemade Harvest cookbook. These are wonderful for breakfast!

Pumpkin Sweet Rolls

1 envelope active dry yeast                           1 cup brown sugar
1-1/4 c. warm milk                                       1-1/2 t. cinnamon
1 c. canned pumpkin                                    1 c. powdered sugar
1/2 c. sugar                                                  1 to 2 T. milk
1-1/4 c. butter, divided                                 1/2 t. vanilla extract
1 t. salt                                                         7-1/4 c. flour divided

In a large bowl, dissolve yeast in milk warmed to 110 to 115 degrees. Add sugar aand let the yeast activate a couple of minutes, then add the pumpkin, 1/2 cup melted butter, salt and 4-3/4 cup flour. Beat until smooth. Stir in enough of remaining flour to form a soft dough, up to one cup. (Don't panic most of the rest of the flour is for the streusel, I panicked.) Dough will be sticky. On a floured surface, knead dough until smooth and elastic, about 6-8 minutes. Place in a greased bowl; Cover and let rise in a warm place until double in size, about one hour. Punch dough down, (I loved this part.) Roll into a 24 inch by 10 inch rectangle. For streusel combine  1-1/2 cups of flour, brown sugar, cinnamon, and 3//4 cup cold butter; set aside one cup. Sprinkle remaining streusel over dough and roll up jelly roll style, starting with long side. Cut into 24 slices. Place cut side down in two greased 9x13 inch pans. sprinkle with reserved streusel. Let rise until double, about 30 minutes. Bake at 375 degrees for 20-25 minutes, or until golden. Combine powdered sugar, milk and vanilla; drizzle over rolls, serve warm. Makes 2 dozen rolls.

More thoughts from me: Next time I will make a cream cheese frosting instead of the powdered sugar glaze. I think this would put it over the top! I also think I will try making one half as sticky buns.


The ingredients

The ingredients
First batch of dough :( I think I had the milk to warm, I waited and it never rose.......
I didn't give up and tried again. This looks more like it :)
The Streusel


Rollin' in the dough!


The finished product......yum! Where's my coffee?

Welcome To The Pink Kitchen.

A little background here on the pink kitchen. The cabinets really are pink. I didn't mean for them to be pink, but a funny thing happened during the remodel. I was in the midst of dental hygiene school and driving about 200 miles a day back and forth to school. The project was left in the capable hands of contractor friend, (actually he was a boyfriend at the time, but that's another story.) Said friend called on the day the cabinets arrived to inform me that they were pink. Now, what I had intended was a nice whitewash effect. What I had not factored into the equation was the fact that I had chosen maple cabinets. Anyone out there who knows anything about wood is now rolling their eyes and thinking "oh boy, what a ditz." For those of you, who like me, are unaware of the character of maple, I quote from the inside of the cabinet door in my pink kitchen, "Hard maple is a strong, close grained wood that is predominately off-white in color, although it also contains light hues of yellow-brown and PINK (okay, the capitalization is mine.)" Now they tell me! Obviously with my gutted kitchen full of custom pink cabinets, there wasn't a thing to do about it. Fortunately, I do love pink, but I wonder if it will create a problem if I ever try to sell my little cottage to some retired farmer.......


This is where the mayhem happens!


This is where I should spend more time doing dishes.....I don't like the cleanup :(

Re-Post Happy Birthday Here

Happy Birthday!!!

I know, It isn’t MY birthday yet, but today IS the birthday of my blog: LIFE FROM HERE

HERE is an interesting word, an interesting place. HERE I will reflect on how I got HERE, living in the HERE and now, and where do I go from HERE. As you will see, this really is a blog for me and about me. A random journey of my life and mind as I reflect on the steps that led me HERE and those I have yet to take. How I got HERE, well that’s an interesting story with so many twists and turns that if it didn’t really happen to me, it could almost be a novel rather than the little cautionary tale that it is.


You might well ask what started this spate of introspection. My upcoming birthday for one, the fact that my baby graduates in a couple of years for another….. where do I go from HERE? I want to live Happily Ever After of course! Many of you may know one of my pet peeves is the “Welcome to Wauneta” sign. For those of you that aren’t familiar with it, it reads, “Welcome to Wauneta……..half way between here and there.” It’s like one of those Zen koans… there is no there, there. What does that mean?  Does it mean that HERE is no place you want to stay? That THERE is someplace better than HERE?  I think too often we make the mistake of believing that happily ever after is a place, a destination, an end point. But it’s not. If as they say, life is a journey, then the best you can hope for are little pit stops of happiness along the way. Happily Ever After is HERE, the HERE and now, it’s all we’ve got.
In fact, it’s only in the last 5 years, that I’ve been acquiring a new perspective on life. Sometimes it’s fun, other times puzzling and many times it’s hard.  I’d like to think I’m a littler bit wiser, rather than worse for the wear and tear on my soul. By and large I am. The mistakes are fewer, the pleasures simpler, and the “down time” a whole lot less than it used to be.
At the end of the day – I have realized that many of the steps forward you take on the journey, you take by yourself. Sometimes you get a little help along the way, that’s why God invented your mother, sisters, daughters and girlfriends. (Sometimes I think God should have quit while he was ahead). And then of course there are those other steps, too…you know, the ones that have you going round in circles or just plain backward. Unfortunately, those steps are yours alone…every single one of them.
 The good news is, as a woman, you can always stop and ask for directions. That’s not an easy thing to do especially when you’re trying to show that you’re calm, confident and in control. How can you ask for help when you’re trying to live up to a role that you think everyone expects you to fulfill….that of Wonderful Woman?
If today is the first day of the rest of our lives, let’s make it a good one! I challenge everyone to really be HERE in their lives, not living in the past, not waiting for a better time in the future, but being HERE today, and making the most of it. One step on my own personal journey is going to be training for a half marathon. I will lace up my shoes and take the first step, HERE, today.
The journey to HERE has sometimes been a lot of fun, — but most of the time it’s a lot of work and sometimes it’s a little lonely. Come join me HERE. Stay tuned for more pit stops of happiness along the way.
Lisa